Integrate Email-OTPs to your applications with the WSO2 Identity Server

WSO2 Identity Server (WSO2IS) now supports integrating Email-OTPs for customizations in addition to multi-factor authorization (MFA).
As an example, let’s say you are integrating the WSO2 Identity provider in your environment. When a user who is already logged into your application wants to do a transaction you want to trigger an added security functionality, and for this, you want to send Email-OTP for that particular user’s mailbox thereby verifying the transaction is done by the same person who uses the application. Previously it cannot be done with WSO2IS but now you can do it with newly introduced Email-OTP REST API endpoints.
Why need OTPs?
The OTP feature prevents some forms of identity theft by making sure that a captured username/password pair cannot be used a second time. So if we want to add some security for some functionalities after the user is logged in to the application, OTPs can be used to verify the user is who it is.
How to use Email-OTPs with the WSO2IS
There are two ways to integrate Email-OTPs into your application,
- Using Email-OTP as a service
- Using Email-OTP REST APIs
Using Email-OTP as a service
- Build
org.wso2.carbon.extension.identity.emailotp.commonfrom here, using themvn clean installcommand and put it in the <IS_HOME>/repository/components/dropins location. - Add the below configurations to the <IS_HOME>/repository/conf/deployment.toml file.
3. If notifications are managed by the Identity Server, configure the Email template by appending below at the end of the <IS_HOME>/repository/conf/email/email-templates-admin-config.xml file.
4. Add org.wso2.carbon.extension.identity.emailotp.common as a dependency on your maven project.
5. To use Email-OTP in your application you need to call, EmailOtpService.generateEmailOTP(userID); and need to pass the SCIM-ID (userId) of the user. (Below is a custom code snippet that can be used to get userID from username and tenantDomain by username)
If the properties.triggerNotification=true in the deployment.toml file configurations your application will receive a transactionId and emailOtp will be sent to the User’s mobile via WSO2IS. If the properties.triggerNotification=false your application will get emailOtp and transactioId both, because we expect that your application will send that emailOtp via an external Email provider.
6. To validate Email-OTP you need to pass the below parameters.
emailOtp — Email-OTP valuetransactionId — transactionId generated when the Email-OTP is generated.userId — User’s ID, (SCIM-ID of the user)
Then you need to call EmailOtpService.validateEmailOTP(transactionId, userID, emailOtp); to validate your Email-OTP. (Below is a custom code snippet that can be used to get userID from username and tenantDomain by username)
Using REST APIs
To run the REST APIs for Email-OTP, you need to configure the Email-OTP service as mentioned in the above 1–3 steps. Then follow the below steps.
- First, build
org.wso2.carbon.identity.api.otp.service.emailotpfrom here, usingmvn clean installcommand and put it in the <IS_HOME>/repository/deployment/server/webapps location. - Next, add Permissions
- Start WSO2 identity server and log in to management console https://<hostname>:<port>/carbon/admin/login.jsp
- Go to
Main -> Registry -> Browse -> /_system/governance/permission/admin/manage/identity/authentication/Add Collection, and give that collection nameotp. Inside the newly created collection, there is an area to add properties, click there to add property and give name asnameand value asotp. - Like that create two more permission collections inside the newly created
otppermission as below.
/_system/governance/permission/admin/manage/identity/authentication/otp/generate this permission is to generate the otp.
/_system/governance/permission/admin/manage/identity/authentication/otp/validate this permission is to validate the otp.
- Go to
Main -> Identity -> Users and roles -> add -> add new roleand create a role withgeneratepermission and another role withvalidatepermission. - Assign role with
generateto some less privileged user and assign a role withvalidatepermission to users you need OTP created.
3. Go to the <IS_HOME>/repository/conf/deployment.toml file, and add the below configurations.
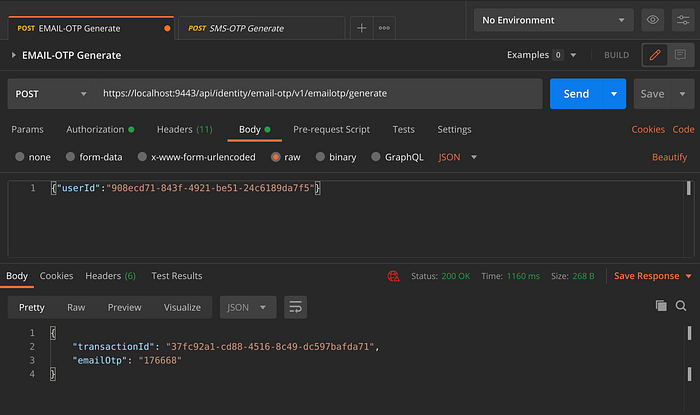
4. To generate Email-OTP you can use below CURLs
carbon.supertenanthttps://{server-url}:{server-port}/api/identity/email-otp/v1/emailotp/generate
curl -X 'POST' \
  'https://localhost:9443/api/identity/email-otp/v1/emailotp/generate' \
  -H 'accept: application/json' \
  -H 'Content-Type: application/json' \
  -d '{
  "userId": "8b1cc9c4-b671-448a-a334-5afe838a4a3b"
}'
Other tenants
https://{server-url}:{server-port}/t/{tenant-name}/api/identity/email-otp/v1/emailotp/generate
curl -X 'POST' \
'https://localhost:9443/t/cloud.com/api/identity/email-otp/v1/emailotp/generate' \
-H 'accept: application/json' \
-H 'Content-Type: application/json' \
-d '{
"userId": "8b1xx9c4-b671-448a-a334-5afe838a4a3b"
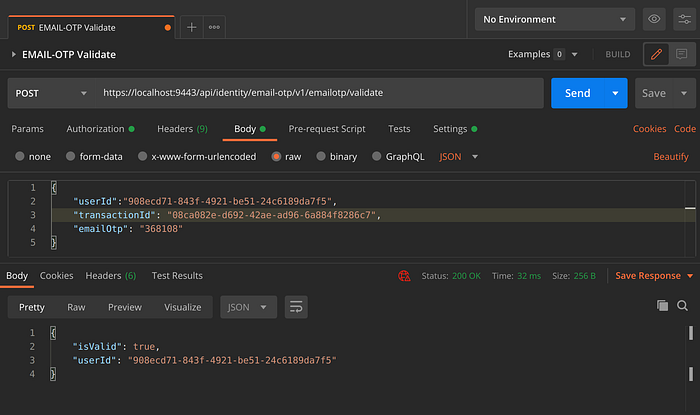
}'5. To validate Email-OTP you can use below CURLs
carbon.supertenanthttps://{server-url}:{server-port}/api/identity/email-otp/v1/emailotp/validate
curl -X 'POST' \
  'https://localhost:9443/api/identity/email-otp/v1/emailotp/validate' \
  -H 'accept: application/json' \
  -H 'Content-Type: application/json' \
  -d '{
   "userId":"8b1xx9c4-b671-448a-a334-5afe838a4a3b",
   "transactionId": "string",
   "emailOtp": "string"
}'
Other tenants
https://{server-url}:{server-port}/t/{tenant-name}/api/identity/email-otp/v1/emailotp/validate
curl -X 'POST' \
  'https://localhost:9443/t/cloud.com/api/identity/email-otp/v1/emailotp/validate' \
  -H 'accept: application/json' \
  -H 'Content-Type: application/json' \
  -d '{
  "userId": "8b1cc9c4-b671-448a-a334-5afe838a4a3b",
  "transactionId": "string",
  "smsOTP": "string"
}'
You can find the JSON collection for the REST APIs for Email-OTPs here and the API contract here.

